AI Grading with Assign2
Published on: 2026-05-21 by Edufide
Assign2’s AI grading feature uses large language models to score written student responses against a rubric you define. AI grading currently works with in-person exams that have been scanned and uploaded by an instructor. It can grade a single submission at a time, run across an entire cohort in the background, and compare results against your existing manual scores — all without leaving the marking interface.
Contents:
Overview and Prerequisites
AI grading is an optional feature that must be enabled by Edufide for your institution. Contact support if you would like access.
Once enabled, three controls appear in the marking interface:
Robot icon (toolbar) — opens the AI Rubric Settings modal where rubrics are written and saved per question.
Robot-outline icon (comment panel) — opens the AI Grade dialog to trigger grading of the current question.
Test-tube icon (comment panel) — opens the A/B Test modal to compare AI scores against existing manual scores without saving them.
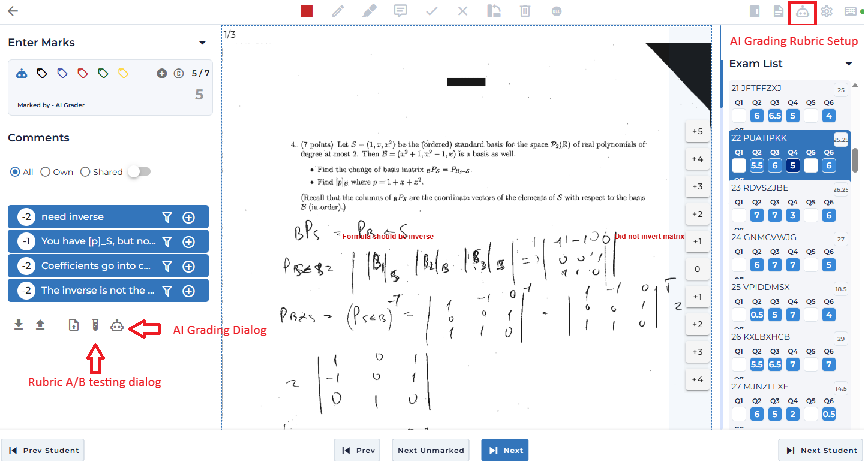
For AI grading to work on a question, the assessment must be an in-person exam with scanned pages uploaded by an instructor. The robot-outline icon only appears when the current question has scan pages associated with it.
Recommended Setup Workflow
Before unleashing AI on your entire cohort, it is essential to validate the rubric against a sample of manually graded work. Follow these steps each time you set up AI grading for a new question or assessment.
Step 1 — Grade the First 20 Submissions Manually
Mark at least the first 20 student submissions for the question by hand, as you normally would. As you work through them, note the common patterns: what partial-credit answers look like, what mistakes recur, and what a full-marks answer contains. These observations will form the basis of your rubric.
Do not skip this step. The A/B test in Step 4 compares AI scores against your manual scores — without a set of hand-graded answers there is nothing to compare against.
Step 2 — Write the AI Rubric
Click the robot icon in the marking toolbar to open the AI Grading Rubrics modal. For the question you just graded:
Fill in the Question Content field with the full question text (and any diagrams or formulas as images).
Write the Grading Rubric — one criterion per line, each with its mark allocation. Be specific: describe what the answer must contain to earn each mark, not just what the topic is.
Use Generate Rubric (magic-wand icon) as a starting draft if you prefer, then edit it based on what you observed while marking.
Click Save Settings.
See Section 3 for full details on the rubric editor.
Step 3 — Navigate to the First Student in the Exam List
In the marking interface, click the first student in the exam list. This is important: the A/B test dialog grades submissions starting from whichever student is currently selected and works forward through the list. Starting at student 1 ensures the test covers the same 20 you graded manually.
Step 4 — Run the A/B Test on Your 20 Graded Submissions
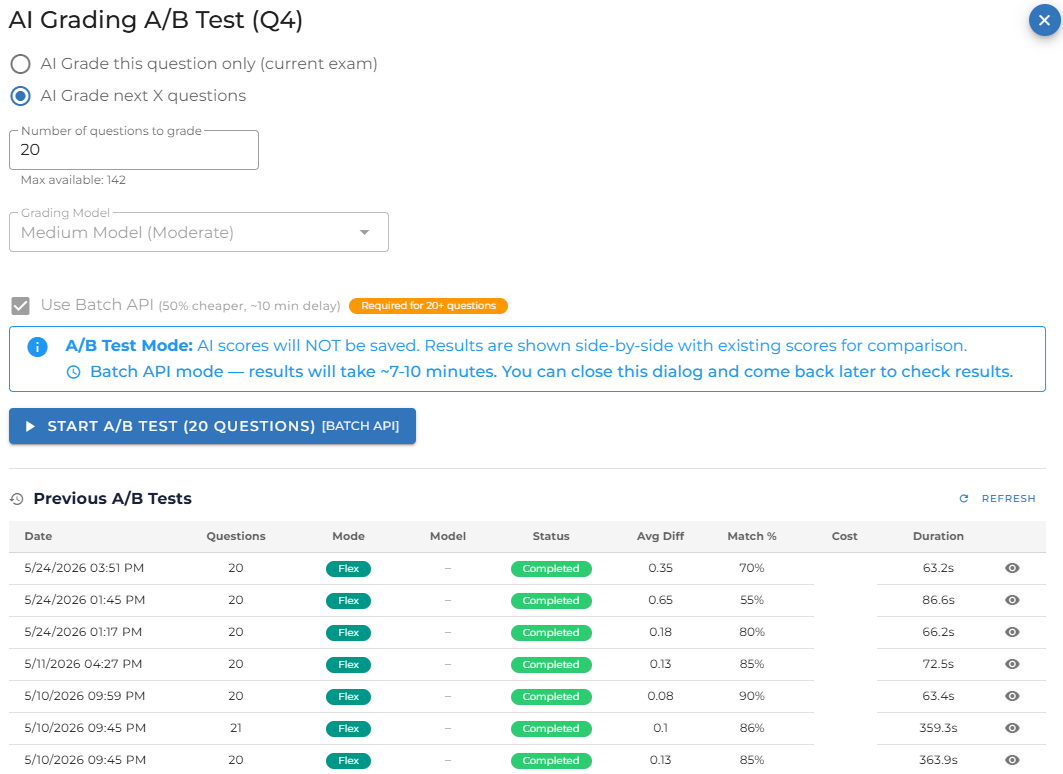
Click the test-tube icon (below the comment list) to open the AI Grading A/B Test dialog.
Select “AI Grade next X questions”.
Set the count to 20 (or however many you manually graded).
Leave the model on the default (Medium Model) for your first test run.
Click Start A/B Test.
Results arrive one by one as the AI processes each submission. The dialog shows a live progress bar. When complete, the summary cards and results table appear. AI scores are not saved — this is a comparison run only.
Step 5 — Review the Results
Look at the summary cards first:
Exact Match % above ~70% is a reasonable starting point for most questions.
Avg Score Difference above 1 mark suggests the rubric needs refinement.
Then scan the results table for rows highlighted in orange or red (large score differences). Click the eye icon on each diverged row to open the detailed feedback view, which shows the AI’s per-criterion reasoning alongside the student’s scan pages. Read the AI’s reasoning and identify why it scored differently from you — was the criterion ambiguous? Did the rubric miss a common valid approach?
Step 6 — Tune the Rubric and Repeat
Return to the AI Rubric Settings modal (robot icon in the toolbar) and update the rubric to address the issues you found: add missing valid approaches, tighten ambiguous criteria, or adjust mark allocations. Save the updated rubric.
Then repeat from Step 3: navigate back to student 1 and run the A/B test again on the same 20 submissions. Compare the new summary statistics to the previous run.
Repeat this tuning cycle until the Exact Match % stabilises and the average score difference is acceptable — typically 2–3 cycles are enough.
Step 7 — Grade the Full Cohort
Once you are confident in the rubric, use the AI Grade dialog (robot-outline icon) to grade the remaining unmarked submissions. For large cohorts, enable Batch API (50% cheaper, ~10 minute delay). See Section 5 for full details.
After grading completes, spot-check a sample of results using the robot icon feedback dialog and override any scores where the AI has clearly erred.
Setting Up AI Rubrics
Click the robot icon in the marking toolbar to open the AI Grading Rubrics modal. This is a full-screen modal with a tab for each question in the assessment.
Question Content
The Question Content field tells the AI what the question asked. Paste the full question text here, including any instructions. If the question includes a formula or diagram, you can include it as an image:
- Drag and drop an image file onto the text area.
- Paste an image directly from your clipboard.
- Click the cloud-upload button to browse for an image file.
LaTeX maths (enclosed in $…$) and Markdown formatting are both
supported. A live preview on the right renders the content as the AI will see it.
Grading Rubric
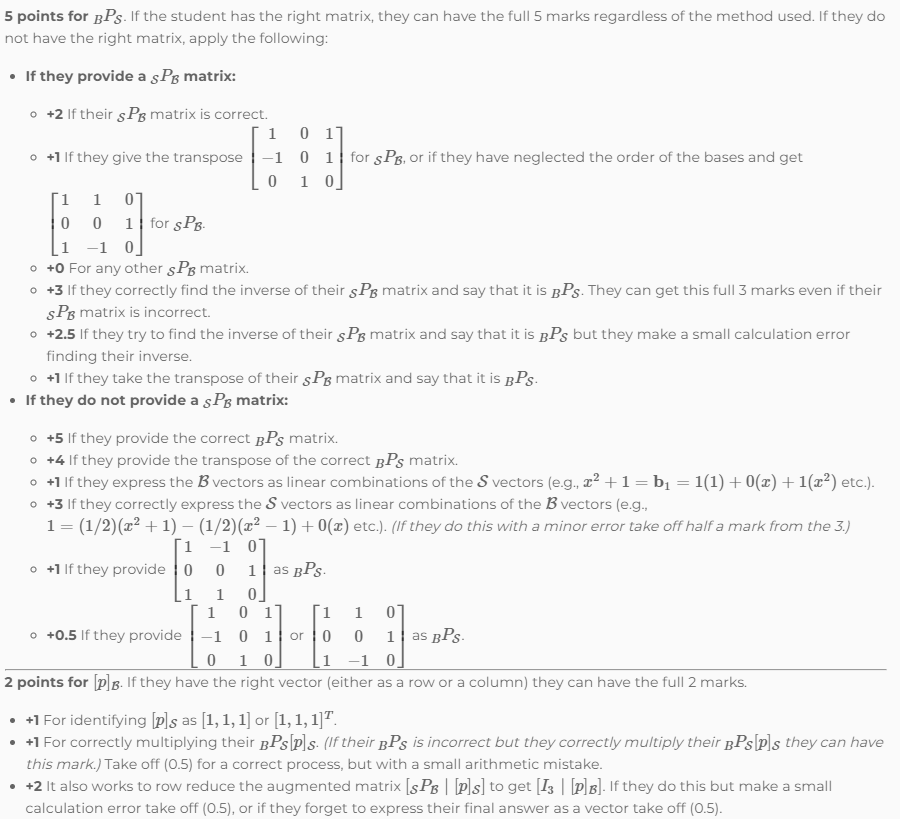
The AI Grading Rubric field defines how marks should be awarded. Write each criterion on its own line or paragraph, including the marks available. The rubric directly controls the AI’s scoring — more specific criteria produce more consistent results.
Example rubric for a 7-mark question:
Like the question content field, the rubric supports LaTeX, Markdown, and embedded images (drag/drop, paste, or upload button).
Generate Rubric Automatically
If you have filled in the Question Content field, the Generate Rubric button (magic-wand icon in the top action bar) sends the question to the AI and asks it to draft a structured rubric. The generated rubric is inserted into the rubric field. Review and edit it before saving — the automatically generated rubric is a starting point, not a finished product.
Page Selection (PDF Import Assessments)
For assessments created by importing a PDF, each question may span multiple pages. A Pages to include in AI Grading checklist appears below the rubric field when more than one page is associated with the question. Uncheck pages that do not contain student answers (such as cover pages or question pages without answer space) to reduce the cost of each grading request.

Saving
Click Save Settings at the top right of the modal. Rubrics are saved per-assessment, per-question, and are shared across all graders in that assessment — any grader can see and edit the rubric.
AI Grading A/B Test
The A/B test lets you compare AI grading results against your existing manual scores without saving or overwriting anything. Use it to validate a new rubric, compare models, or check AI accuracy on a representative sample before committing to full-cohort grading.
Click the test-tube icon below the comment list to open the AI Grading A/B Test dialog.
Setup Options
Mode — grade the current submission only, or grade the next N submissions in the exam list.
Grading Model — choose which Gemini model to use for this test run. See Section 8 for the full model list.
Use Batch API — same 50% cost saving with ~7–10 minute delay. Required for large batches.
Click Start A/B Test to begin. A progress bar tracks completion. When using the Batch API, click Close & Check Later — the job continues in the background and results are stored under Previous A/B Tests.
Results Table
When the test completes, a results table is shown with one row per graded submission:
| Column | Description |
|---|---|
| Existing Score | The score already in the system (manually entered, or “Unmarked”). |
| AI Score | The score the AI assigned for this test run (not saved). |
| Max | The question’s maximum marks. |
| Diff | Difference between existing and AI score. Green = exact match; orange/red = diverged. |
| Review | ”YES” if the AI flagged the answer as needing human review. |
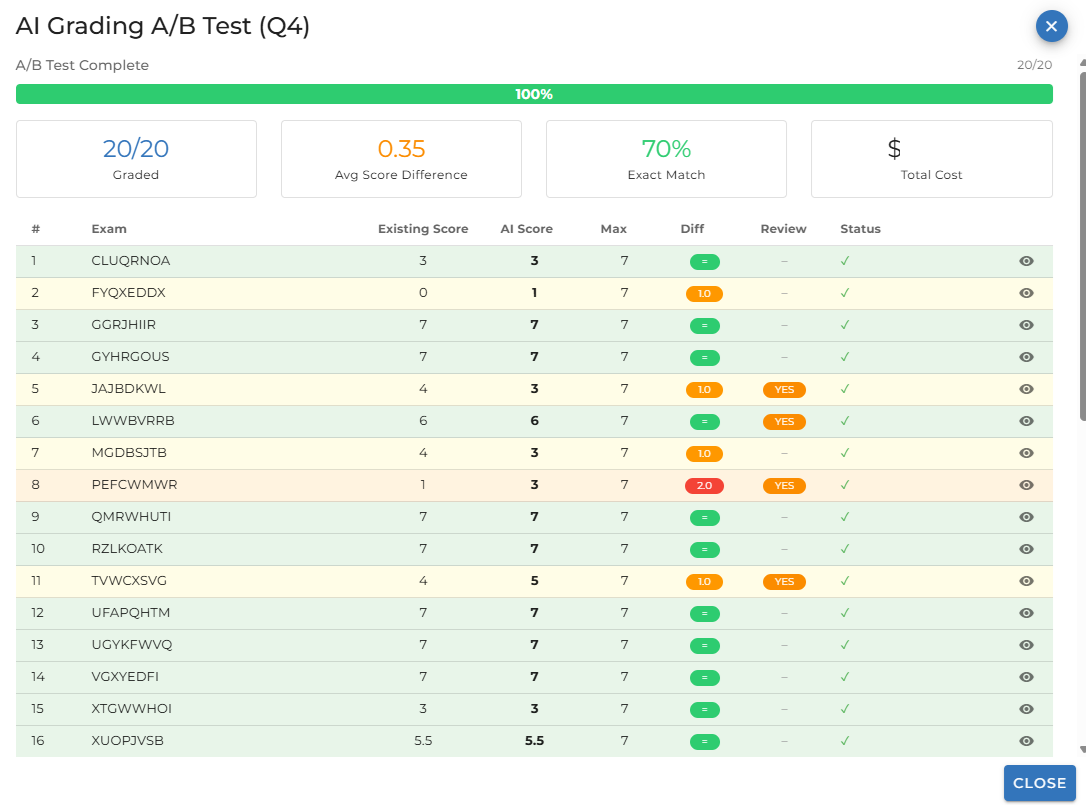
Summary Statistics
Above the results table, four summary cards show:
- Graded — number successfully scored / total attempted.
- Avg Score Difference — mean absolute difference between AI and manual scores.
- Exact Match % — proportion of submissions where AI and manual scores agree exactly.
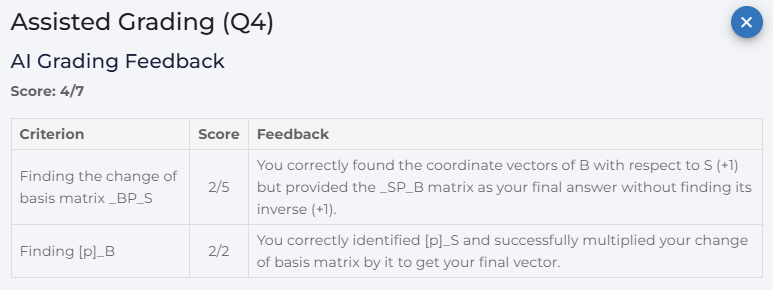
Rubric Feedback Detail
Click the eye icon on any row in the results table to open the detailed feedback view. This shows:
- Side-by-side manual score and AI score cards with the difference highlighted.
- A rubric feedback table listing each criterion, its score (e.g. 2/3), and the AI’s written explanation.
- The student’s submission page images as they appeared during grading.
Running AI Grading
Once a rubric has been saved for a question, open the marking interface and navigate to any student’s submission for that question. The robot-outline icon (below the comment list) opens the AI Grade dialog.

Single Mode
Select “Grade this submission only” to grade the current student’s answer for the current question. Click Grade. The request is sent immediately; the score and feedback appear in the marking interface within a few seconds via the live socket connection.
Batch Mode
Select “Grade next N submissions” to run AI grading across multiple students starting from the current position in the exam list. Only unmarked submissions with uploaded pages are included. Set the count using the number field.
Batch mode has two processing options:
Standard (default) — all requests are sent immediately in parallel. Results arrive one at a time as the live socket updates the marking interface. Best for up to 5 submissions.
Batch API (checkbox: “Use Batch API, 50% cheaper, ~10 min delay”) — requests are bundled into a single Google Gemini Batch API job, which costs 50% less per token but takes approximately 7–10 minutes to complete. Results are applied to the marking data automatically when the job finishes; the Refresh Data button will appear when they are ready. Batch API is required for more than 5 submissions.
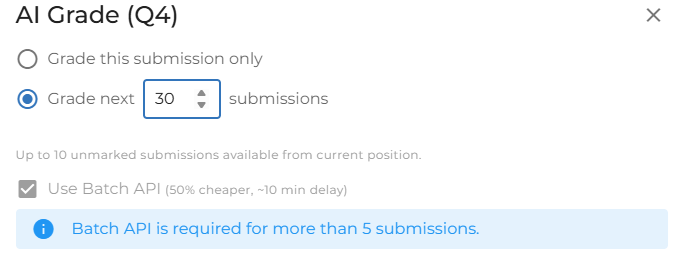
After clicking Grade, an information banner confirms whether results will arrive live or via the background Batch API. The dialog closes automatically after a short delay in standard mode, or can be closed manually when using the Batch API.
The AI-Graded Badge and Feedback Dialog
When a question has been scored by AI, the marking type button in the score entry panel changes from the usual M/A icon to a blue robot icon.
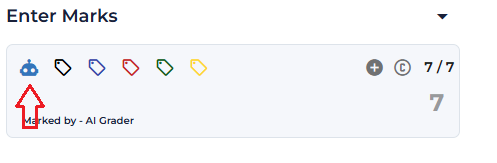
Click the robot icon to open the Assisted Grading dialog. This shows the AI’s full written feedback for the question, including:
- A score breakdown per rubric criterion.
- The reasoning the AI applied for each criterion.
- Any flagged areas of uncertainty or requests for human review.
The score entered in the score panel reflects the AI’s total. You can accept it, adjust it manually, or clear it entirely using the C button — see Section 9.
Reviewing and Overriding AI Grades
AI grades are recorded with a marking type of Auto and attributed to the ai_grader system account. They are treated the same as any other automatic grade — visible in the results CSV, included in the total, and shown in the marking interface with the robot icon badge.
Accepting an AI Grade
If you are satisfied with the AI’s score, no further action is needed. The score is already saved. You can read the AI’s reasoning by clicking the robot icon in the score panel.
Adjusting an AI Grade
Type a new score in the score field and press Enter. The score is overwritten and the marking type changes from Auto to Manual. The robot icon disappears and is replaced by the standard M icon. The AI’s feedback is still accessible by clicking the M icon (which opens the marking type toggle confirmation).
Clearing an AI Grade
Click the C button in the score panel to reset the question to unmarked. This removes the score, the AI feedback, and all comments placed during the AI grading run. The question is then available for manual grading or a fresh AI grading request.
Workflow Summary
For the full step-by-step setup workflow — including how to grade a sample manually first, write the rubric, and run A/B validation cycles — see Section 2: Recommended Setup Workflow.