Marking student submissions and exams
Published on: 2026-05-20 by Edufide
This article describes how instructors can use the marking interface in Assign2 to grade student submissions and exams. The marking interface supports multiple simultaneous graders, keyboard-driven scoring, AI-assisted grading, and flexible annotation tools.
Contents:
Entering the Marking Interface
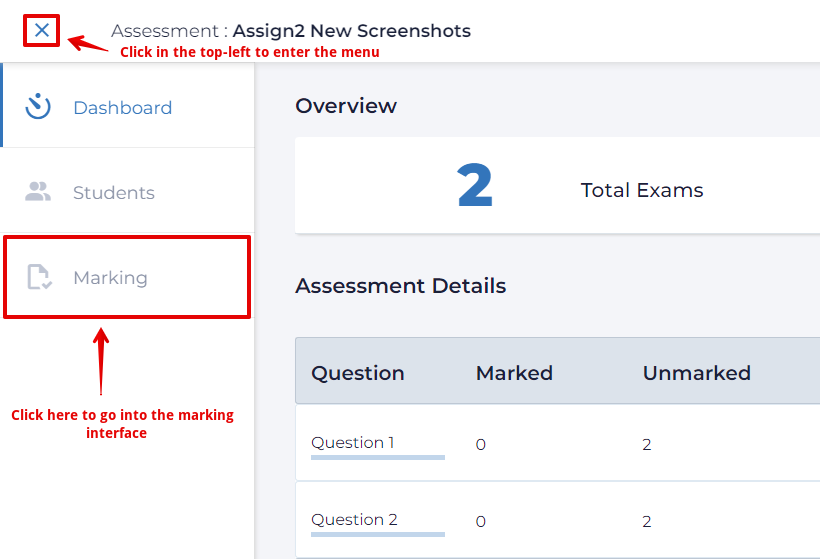
Once students have completed assignments, work can be graded by clicking the Marking option from the navigation dropdown at the top left of the assessment dashboard.
The marking interface opens with the first student’s submission displayed on the canvas. Multiple graders can work in the same assessment simultaneously — see Section 8 for details on real-time collaboration indicators.
The Toolbar
The toolbar runs across the top of the marking interface. In addition to the annotation tools, it contains several controls for managing the marking session.
Connection status dot — a small circle at the far left shows whether the real-time socket is connected. Green means live; grey means disconnected. Assign2 reconnects automatically whenever you move the mouse or press a key.
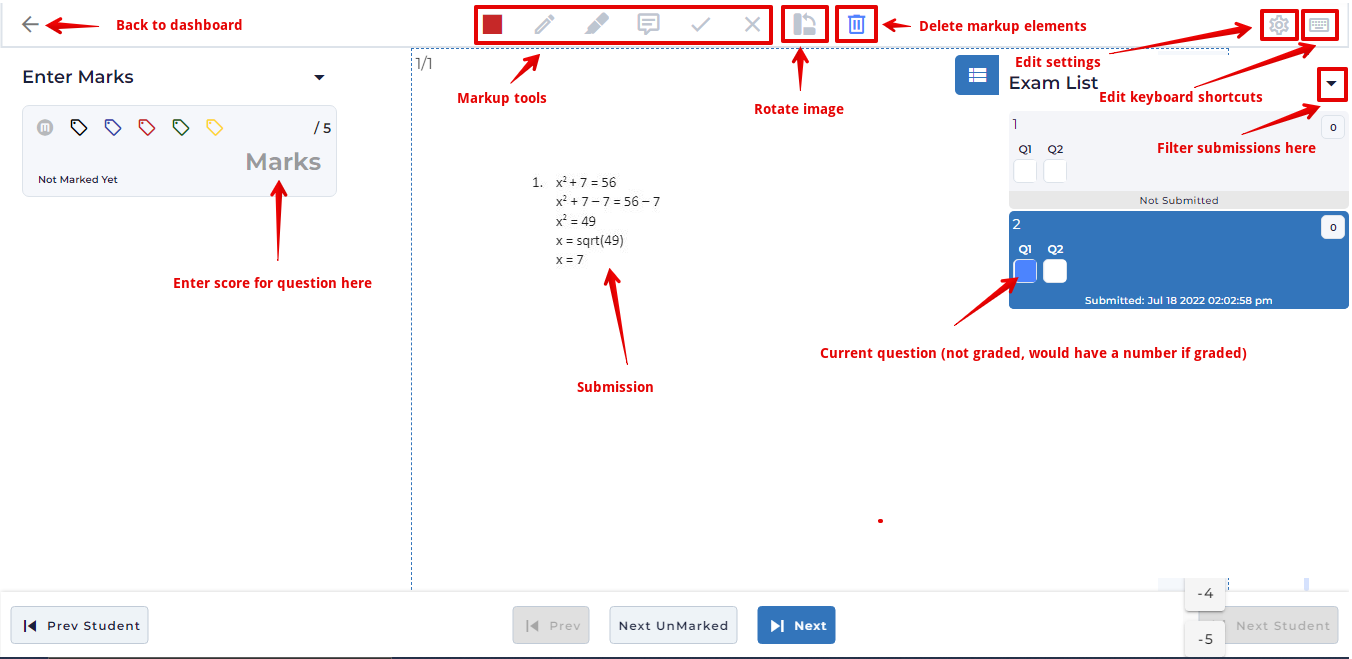
Back arrow — returns to the assessment dashboard.
Colour picker — sets the active colour for the pencil and brush tools.
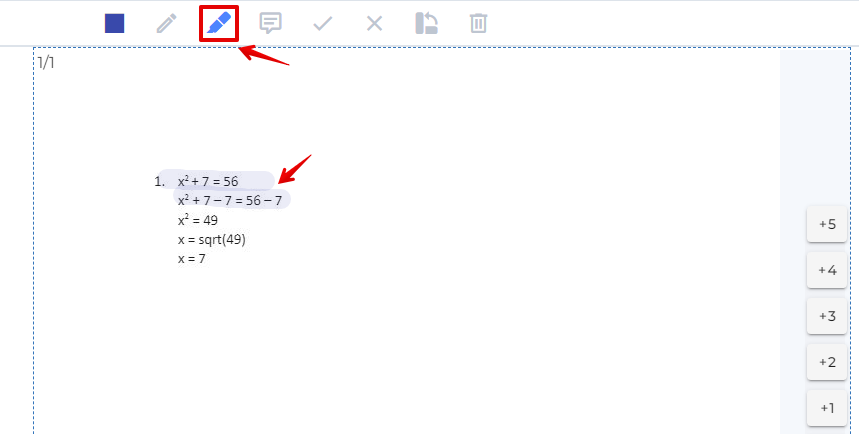
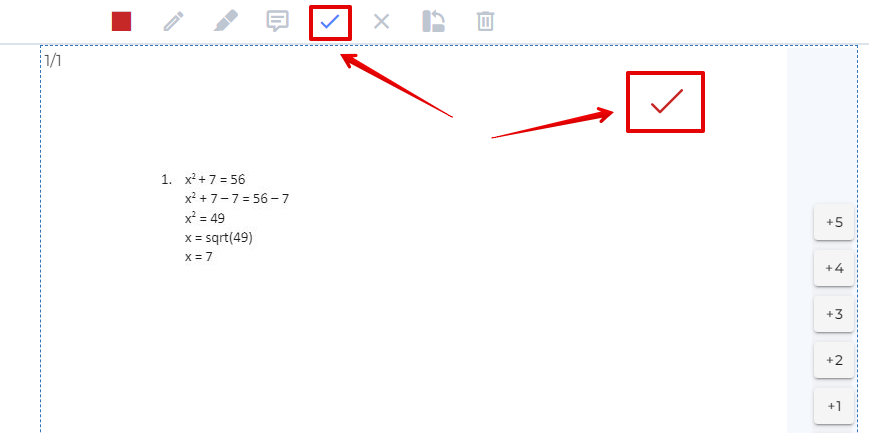
Annotation tools — pencil, brush (highlighter), tick, cross, and delete. See Section 5.
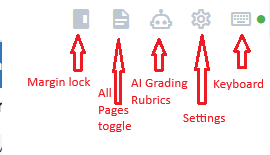
All Pages toggle (document icon) — switches between showing only the pages for the current question and showing every page in the student’s submission. See Section 7.
Margin lock (sidebar icon) — locks the right-hand comment margin so it stays fixed while you scroll the canvas. Highlighted blue when locked.
AI Grading Rubrics (robot icon) — opens the AI rubric settings modal. Only visible when AI grading is enabled for the assessment. See Section 11.
Settings (cog icon) — opens the Question Settings modal for quick-score configuration and image display adjustments. See Section 10.
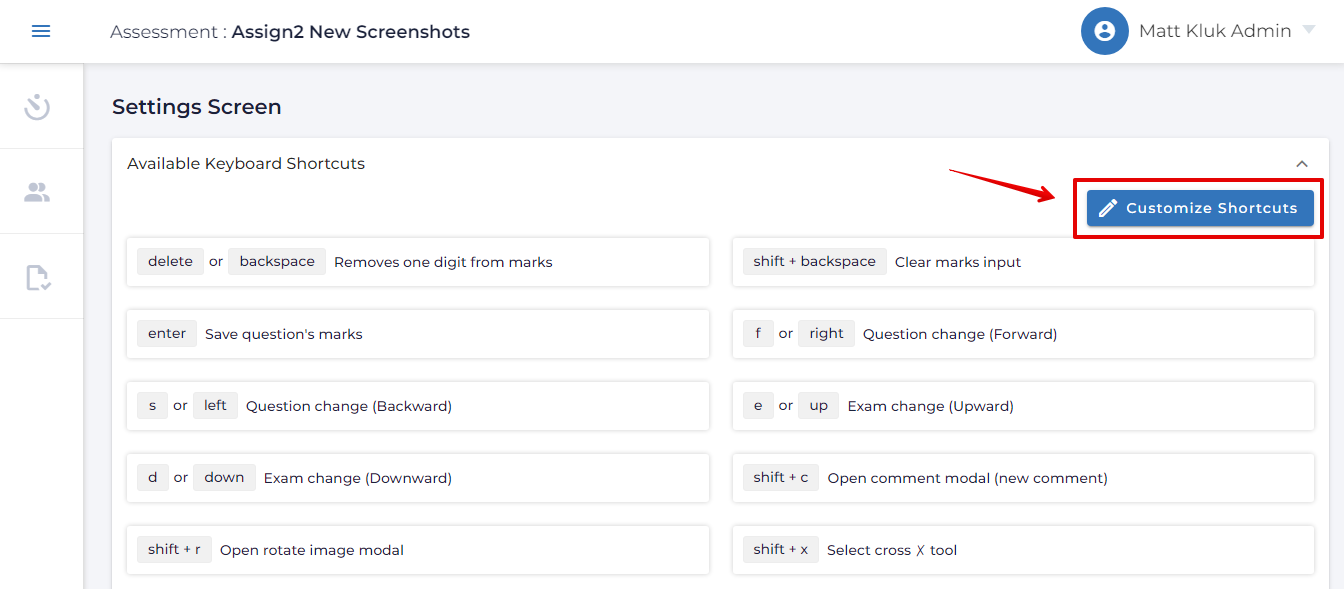
Keyboard shortcuts (keyboard icon) — navigates to the Keyboard Settings page where shortcuts can be customised per-user.
Keyboard Shortcuts
The following keyboard shortcuts are available in the marking interface. All shortcuts can be customised via the keyboard icon in the toolbar.
- [Shift + c] — open new comment
- [Shift + r] — open rotate image dialog
- [Shift + x] — select cross ✗ tool
- [Shift + y] — select tick ✓ tool
- [Shift + b] — select brush tool
- [Shift + p] — select pencil tool
- [Shift + u] — deselect current tool
- [Shift + z] — show comment pop-up menu at cursor
- [Shift + 1–0] — fire quick score buttons 1–10
- [0–9 / Numpad 0–9] — enter a score digit
- [Enter] — submit the entered score
- [d / ↓] — next student
- [u / ↑] — previous student
- [n] — jump to next unmarked student
- [v] — start feedback video recording
- [h] — stop feedback video recording
- [Ctrl + g] — select annotation delete tool
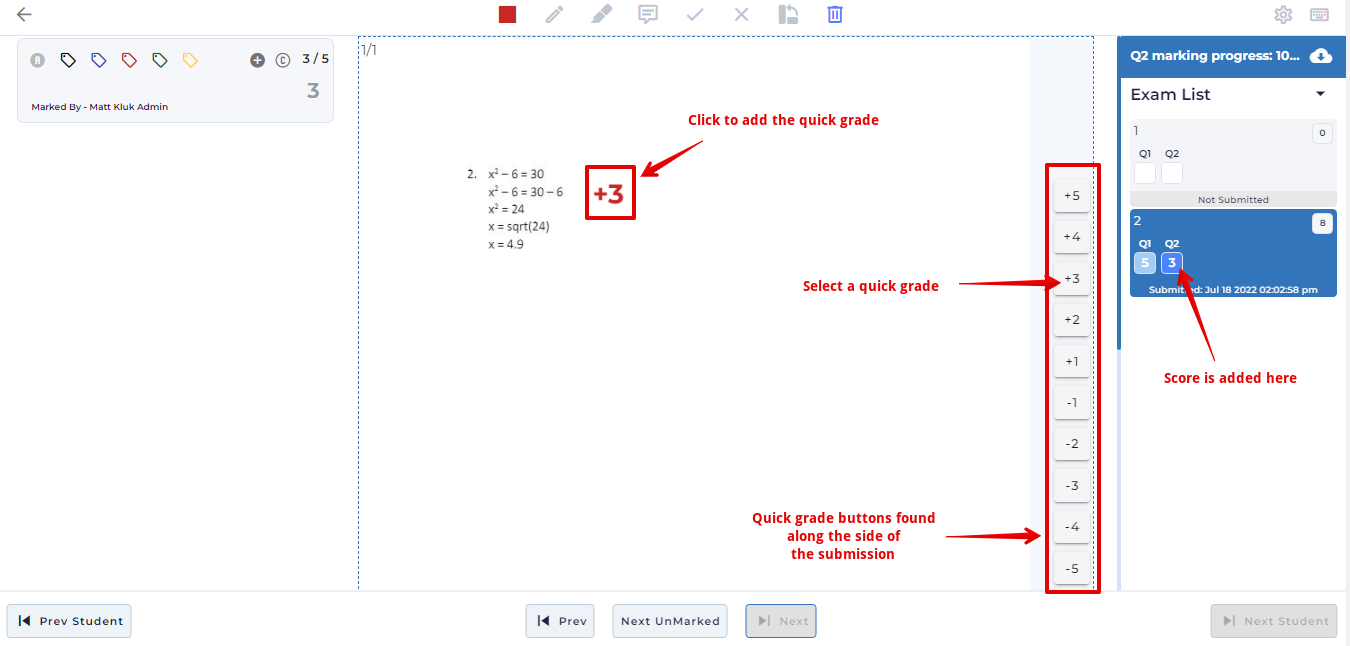
Score Entry Panel
The score entry panel sits in the left-hand column. It shows the current score, provides a calculator for entering marks, and displays marking status information.
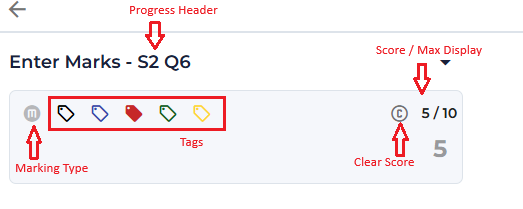
Progress Header
When enabled, the panel header shows SX QY (Student X of total, Question Y of total) so the grader always knows their position in the marking queue.
Score / Max Display
The current score and the question’s maximum marks are always shown side by side (e.g. 7 / 10). An ungraded question shows a blank score field.
Marking Type Indicator
A small icon next to the score field shows how the question was graded:
- M — manually scored by an instructor.
- A — auto-calculated (from comments or quick scores).
- Robot icon — graded by AI. Click the icon to open the AI feedback dialog and read the AI’s full reasoning. See Section 11.
Clicking the M/A icon when the question already has a score opens a confirmation dialog asking whether to switch the marking type. This prevents accidental overwriting of auto-calculated results.
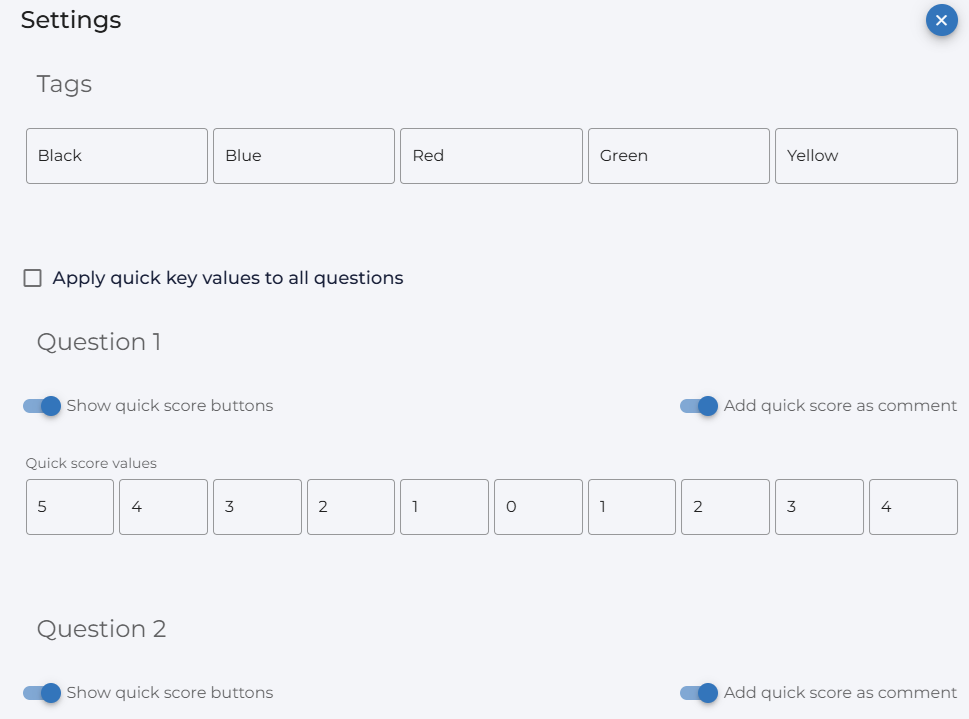
Tag Buttons
Coloured flag icons appear next to the marking type button. Clicking a flag tags the current question for that student — useful for flagging items that need follow-up or second-marking. Tagged questions can be filtered in the exam list. Tag labels can be customised in the Settings modal.
Clear Score
A C (clear) button appears whenever a score has been entered. Clicking it resets the question to unmarked, removes the score, and clears all placed comments for that student and question. This is the correct way to start re-grading a question from scratch.
Calculator / Numpad Panel
A collapse/expand arrow at the top right of the score entry area toggles a numpad grid (digits 1–9, 0, backspace, clear, decimal point, and Enter/OK). Scores can be entered by clicking the numpad or by typing directly on the keyboard — see Section 4 for keyboard shortcuts.
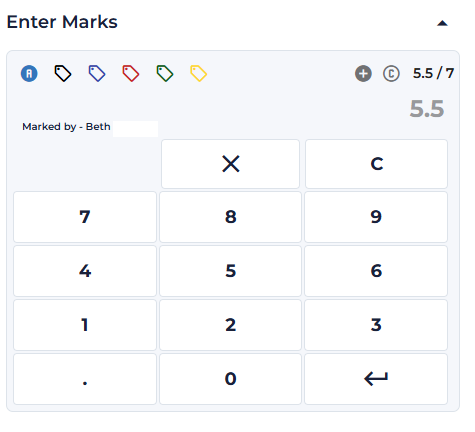
”Marked by” Display
Below the score field, Assign2 shows the name of the grader who last scored the question (e.g. Marked by — Jane Smith). If another grader currently has the same question open, the text changes to Being marked by — [name] in real time, preventing double-grading.
Keyboard & Numpad Scoring
Assign2 supports fully keyboard-driven scoring so that graders with a separate numeric keypad can mark without touching the mouse.
Direct Score Entry
Press 0–9 on the main keyboard or on the numeric keypad to build up a score in the score field. Assign2 automatically prevents the entered value from exceeding the question’s maximum marks. Press Enter to submit.
Quick Score Shortcuts
Shift + 1 through Shift + 0 trigger the ten configurable quick score buttons directly from the keyboard, applying the associated score (and optionally placing a comment annotation on the canvas) without clicking. The values for each shortcut are configured in the Settings modal — see Section 10.
Navigation Shortcuts
| Key | Action |
|---|---|
| d or ↓ | Move to next student |
| u or ↑ | Move to previous student |
| n | Jump to the next unmarked student for the current question |
All shortcuts can be customised from the keyboard icon in the toolbar.
Annotation Tools
The annotation toolbar lets graders draw, highlight, and mark directly on the student’s submission image.
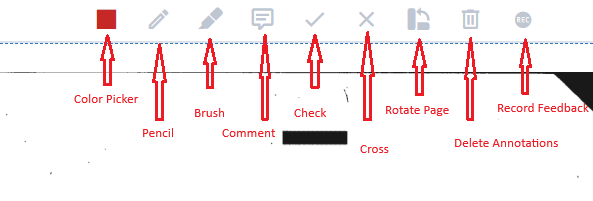
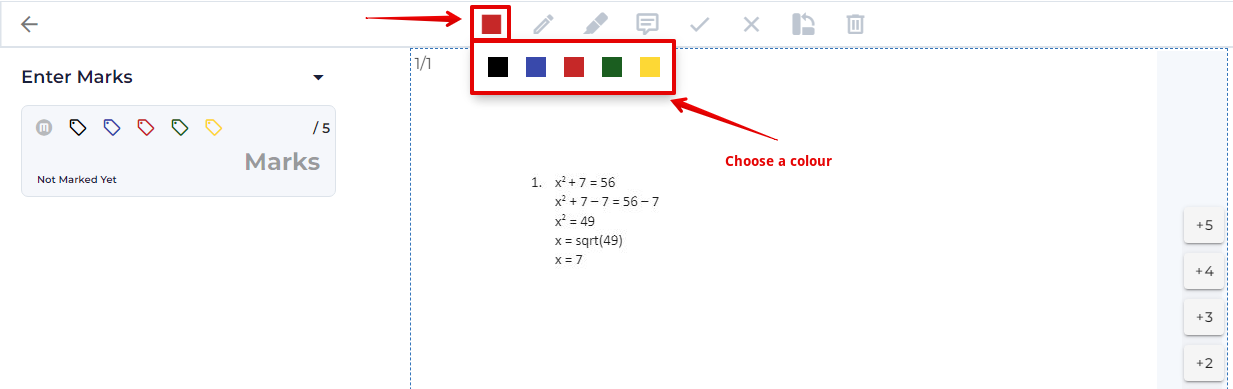
Colour Picker
Click the colour square to open the colour picker and choose the active colour for the pencil and brush tools.
Pencil Tool
Freehand drawing at 1.5 px width in the selected colour. Use for underlining, circling, or any precise annotation.

Brush Tool (Highlighter)
A wide semi-transparent highlighter for marking regions of the submission. The brush uses the selected colour at 10% opacity.
Tick and Cross Symbols
Place a tick (✓) to mark a correct answer or a cross (✗) for an incorrect one. Keyboard shortcuts: Shift + y for tick, Shift + x for cross.

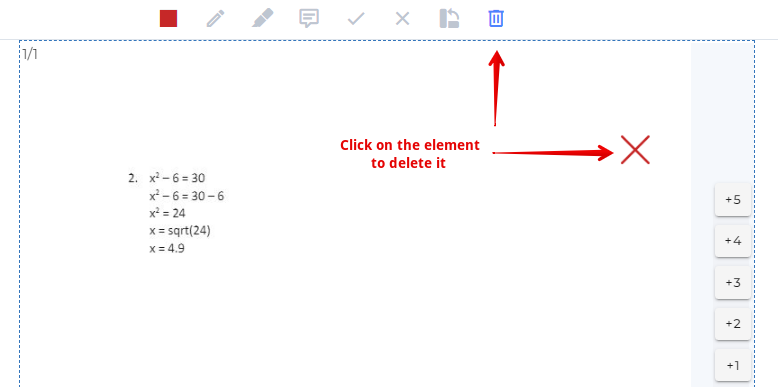
Delete Tool
Select the delete tool, then click any annotation, symbol, or comment on the canvas to remove it. Keyboard shortcut: Ctrl + g.
Rotating Submissions
If a student’s scan was uploaded in the wrong orientation, use the rotate tool (keyboard shortcut Shift + r) to open the rotate dialog. Select the page to rotate and choose from three options: left 90°, right 90°, or upside-down (180°). The canvas updates immediately.


Comments
Comments let graders attach written feedback — with optional scores — to specific locations on a student’s submission. Comments can be saved to a reusable library and shared across all graders in the course.
Creating a Comment
Click the comment icon in the toolbar (or press Shift + c) to open the comment dialog. Type the comment text — plain text, Markdown, LaTeX maths, and embedded images are all supported. A live preview shows how the comment will appear on the canvas.
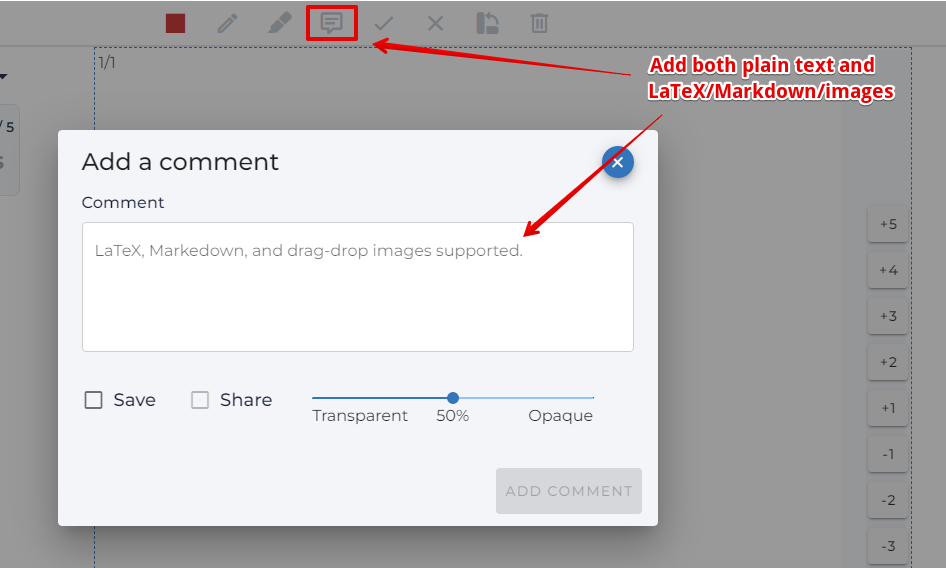
Saving and Sharing
Check Save to add the comment to your reusable library for this question. Check Share to make it available to all other graders in the assessment. Enter a Title for easy identification; if the title is left blank Assign2 generates one automatically from the first few words of the comment text. Enter a value in the Marks field to automatically apply that score when the comment is re-used — negative values are supported.
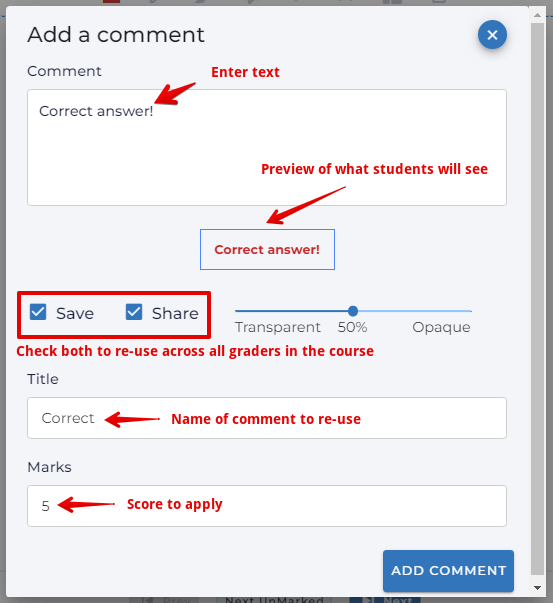
Comment Appearance Options
When creating a comment, two additional options control how it appears on the canvas:
Opacity slider — sets the transparency of the comment’s white background: transparent, 50%, or fully opaque. Useful when the comment overlays important student work.
No Frame checkbox — removes the white background entirely, placing the text or formula directly on the image with no card border.
Image Comments
A worked-solution image can be embedded in any comment. Either drag an image file onto the comment text area, or click the upload button (cloud icon) in the comment dialog. The image is uploaded to Assign2 storage and embedded as a Markdown image link in the comment.
Placing Comments on the Canvas
After creating or selecting a saved comment, click the + (add) icon next to it in the comment list. The cursor changes to a comment icon; click anywhere on the submission to place the comment at that position. The comment’s score is automatically added to the question’s total.
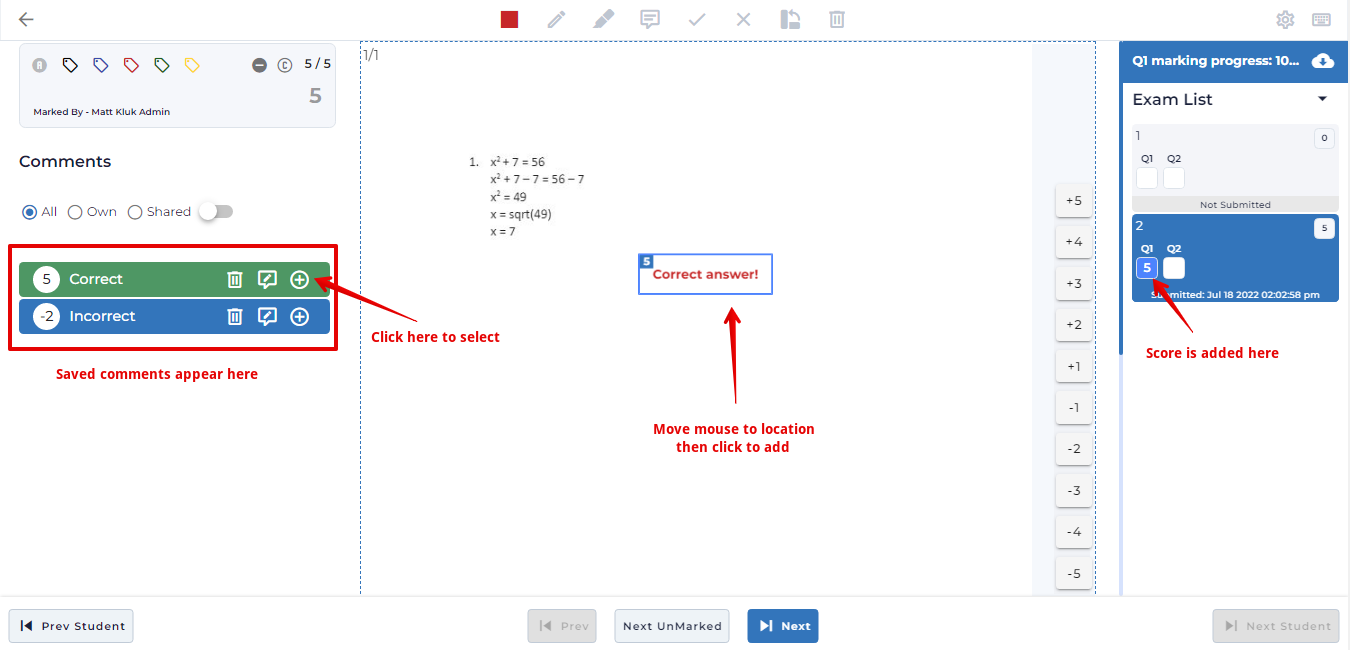
You can also press Shift + z to open a pop-up comment menu at the current cursor position, allowing quick placement without navigating to the sidebar.
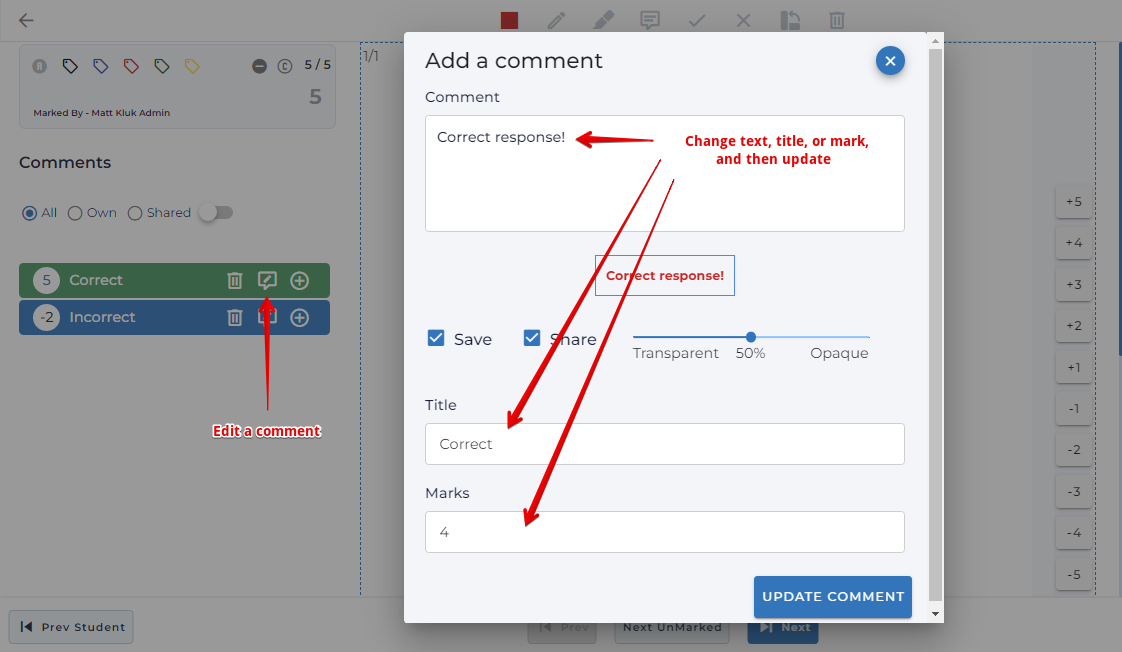
Editing and Deleting Comments
To edit a saved comment in the library, click the edit icon (pencil) beside its name. To delete it, click the trash icon. Note: editing the score of a saved comment updates all instances already placed on student submissions — a page refresh may be needed to see the change.
To edit a comment that has already been placed on the canvas (whether saved or temporary), double-click the comment on the canvas. The comment dialog reopens with the existing text. A temporary comment can also be promoted to a saved library comment at this point by checking Save before updating.
Comment Library — Filter, Search, and Sort
The comment list panel provides several tools for managing a large library:
Filter tabs (All / Own / Shared) — show all comments, only your own, or only those shared by other graders.
Search box — type to filter the comment list by title in real time.
Sort toggle — enables drag-and-drop reordering of the comment list. The custom order is saved per-user per-question.
Comment Used Indicator
Comments that have already been applied to the current student’s question are highlighted in the list. This makes it easy to see at a glance which items have been used, preventing the same feedback from being applied twice.
Filter Exam List by Comment
Each comment in the library has a filter icon (funnel). Clicking it filters the entire exam list on the right to show only students who have that comment applied. Click the icon again to clear the filter. This is useful for checking that a particular piece of feedback has been applied consistently.
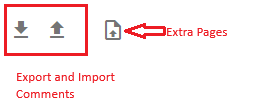
Export and Import Comments (JSON)
At the bottom of the comment panel, two icons manage bulk comment transfer:
Download icon — exports all comments for all questions in the assessment as a single
comments.jsonfile, grouped by question. Useful for sharing a comment library with another instructor or course.Upload icon — opens an import dialog. After uploading a
.jsonfile, a preview lists all comments with checkboxes. Only checked items are imported.
Quick Grade Buttons
The quick grade buttons appear as a vertical strip on the right margin of the canvas. Each button has a configurable positive or negative score value. Clicking a button either adds that score directly to the question total, or (when Add Quick Score as Comment is enabled in Settings) places a score annotation on the canvas at the next click position. The values and behaviour are configured in the Settings modal.
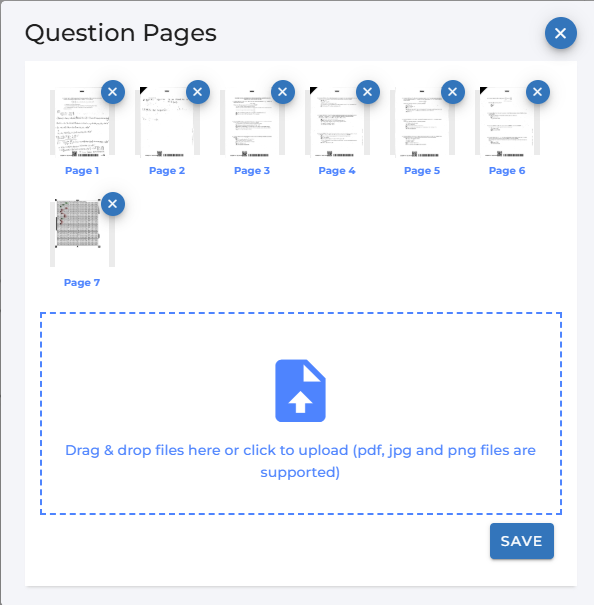
Upload Extra Pages to a Question
If a student continued an answer on a separate sheet that wasn’t automatically associated with the question, click the Upload Pages icon (file-upload icon at the bottom of the comment panel) to attach additional scan pages to the current question.
All Pages Mode
By default, the canvas shows only the pages associated with the currently selected question. All Pages mode expands the canvas to show every page in the student’s complete submission as a single continuous scroll.
When All Pages mode is active:
Annotations and comments from all questions are rendered on their correct pages simultaneously, giving a complete view of all marking in one scroll.
When the grader navigates to a different question, the canvas automatically scrolls to the first page of that question.
New annotations and comments can still be added. Comments are automatically attributed to the question whose pages they land on.
The mode setting is saved per-assessment, so all graders share the same default.
Exam List & Workflow
The right-hand column lists all student submissions for the assessment. Marking is always blind by default — student names are hidden unless Show Student Name is enabled.
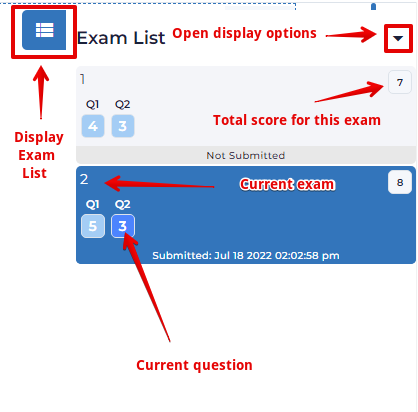
Question Status Cells
Each student row contains a small cell for every question showing its current status:
- Filled blue with score — marked.
- Outline / empty — not yet marked.
- Orange highlight — currently being marked by another grader (real-time).
- Tag icon — the question has a tag applied; the icon uses the colour of the most recently set tag.

Submission Time and Late Submissions
For online assessments, the submission date and time is shown below the question cells. If the submission arrived after the assessment’s due date (a 60-second grace buffer applies), the time is shown in red. If the student had an individual time extension, the extended deadline is used for the comparison.
Filtering and Searching
Use the filter controls at the top of the exam list to narrow down the visible submissions:
- All — show every submission.
- Tagged — show only submissions that have at least one tag applied. When this filter is active, tag-colour buttons appear; click a tag button to narrow further to that specific tag.
- Unmarked — show only submissions with at least one ungraded question.
A search box below the filters matches in real time against the grader’s name, the student’s name (when Show Student Name is on), and the exam ID.

Next Unmarked
The Next Unmarked button in the bottom navigation bar (keyboard shortcut n) jumps to the next student who has the current question ungraded, wrapping around to the beginning of the list when necessary. This is the fastest way to work through a large cohort without manually finding blank questions.

Real-Time Collaboration
When a grader opens a question, Assign2 immediately signals that to all other graders in the same assessment. The question cell in the exam list turns orange with the grader’s name shown, preventing two people from marking the same paper at the same time. If the socket connection drops, the toolbar status dot turns grey and Assign2 reconnects automatically on the next user interaction.
Canvas Features
Zoom
Hold Alt and scroll the mouse wheel to zoom the canvas in or out. Zoom goes up to 3× and snaps back to 100% automatically. This is the only in-browser zoom available on the marking canvas.
Page Numbering
Each page displayed on the canvas is labelled with its position (e.g. 1/3) so graders can quickly see how many pages belong to the current question.
Margin Lock
The Margin Lock toggle (sidebar icon in the toolbar) pins the right-hand comment margin in place while you scroll the canvas vertically. This keeps the quick-grade buttons and comment list visible when working on long submissions.
Question Settings
Click the cog icon in the toolbar to open the Question Settings modal. Settings are saved per-user per-assessment.
Custom Tag Titles
If the assessment has custom marking tags enabled, text fields in the Tags section let any grader rename the default tag labels (e.g. “Flag 1” → “Missing units”). Renamed tags are visible to all graders in the course.
Quick Score Configuration
For each question, the following options are available:
Show Quick Score Buttons — toggle the score buttons on or off in the right margin.
Add Quick Score as Comment — when enabled, clicking a quick-score button places a score annotation on the canvas (like a comment) rather than adding silently to the total.
Quick Score Values — up to 10 values, each configurable. Positive and negative values are both supported; zero is a valid option.
Sync Quick Keys Across All Questions
Enable “Apply quick key values to all questions” to copy the quick-score configuration from Question 1 to all other questions when settings are saved. This saves time when every question uses the same score increments.
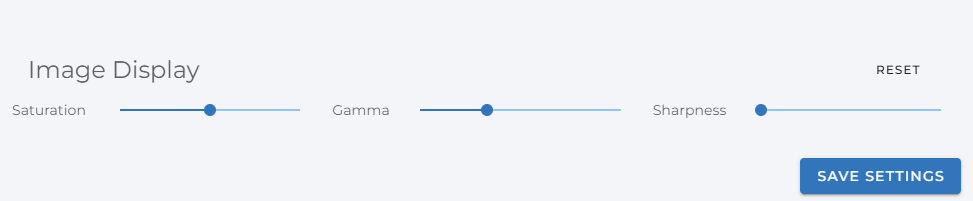
Image Display Settings
Three sliders apply in-browser image processing to all submission images in the current session. Adjust these when scans are too faint, too dark, or blurry:
Saturation (0–2, default 1.0) — increase to make faint pencil marks more vivid; decrease toward 0 for greyscale.
Gamma (0.5–2, default 1.0) — lower values brighten dark scans; higher values darken overexposed scans.
Sharpness (0–1, default 0) — applies an unsharp-mask filter to make soft or blurry handwriting easier to read.
The Reset button returns all three sliders to their defaults. Settings are saved per-user and apply across all assessments.
AI Grading
When AI grading is enabled for an assessment, three AI entry points appear in the marking interface. AI grading requires a grading rubric to be configured first. For full documentation see the AI Grading article.
Feedback Video Recording
For assessments that support it, graders can record a short screen-and-audio video as feedback for a student. The recording captures both the browser screen (showing the marked submission) and the grader’s microphone.
A Feedback Recording section appears in the score panel when the current question supports recordings. To record:
- Click Record (or press v). The browser will ask permission to share your screen and microphone.
- A live timer shows elapsed seconds and the maximum length (up to 120 seconds). Recording stops automatically at the limit.
- Click Stop (or press h) to end early.
- Click Play to review the recording before saving.
- Click Delete to discard it and record again.
Navigating away from the question while recording is in progress is blocked — a warning message is shown until the recording is stopped.
Downloads
Graders with download permission will see a cloud-download icon at the top of the exam list column. Clicking it opens the Downloads dialog with four options:
Download Results CSV — a spreadsheet containing each student’s name, ID, per-question score, and total. Column format adapts to the connected LMS (Canvas or standard).
Download All Assessments (marked, with annotations) — triggers an asynchronous archive job. A download link is sent by email when the archive is ready. Each PDF includes the student’s submission with all annotations drawn on it.
Download Current Assessment — immediately downloads a single student’s annotated PDF. No email; the file downloads directly.
Download All Assessments (without annotations) — same asynchronous archive as above but produces clean, unannotated PDFs.